How to configure IPv6 Address in Windows Server 2025
IANA (Internet Assigned Numbers Authority) is the global organization responsible for managing DNS root, allocating IP addresses & AS numbers (Autonomous System Numbers) to five Regional Internet Registries, Protocol numbering system etc. IANA (Internet Assigned Numbers Authority) is run by ICANN (Internet Corporation for Assigned Names and Numbers), another global organization.
Click the following link to learn more about the organizations which control the Internet, Network Protocols and Standards.
On Monday, January 31st, 2011, IANA (Internet Assigned Numbers Authority) allocated two pools of IPv4 to APNIC from the last remaining IPv4 addresses. APNIC is the RIR (Regional Internet Registry) administering IP addresses for the Asia Pacific. Remaining IPv4 addresses from the free pools were allocated to the remaining RIRs (Regional Internet Registry) later. The world was in short of IPv4 addresses and IPv6 came later.
Please refer the following link to know more about the limitations of IPv4. IPv4 has already phased out from the computer networking industry. This tutorial lesson explains how to configure IPv6 Address in a computer running Windows Server 2025 Desktop experience.
If you are new to IPv6 or need to refresh your knowledge in IPv6, I suggest you to visit the following link to learn more about IPv6.
Step 1 – To configure and IPv6 address and related TCP/IPv6 settings in Windows Server 2025, right-click "Network" icon from the Windows Server desktop and click "Properties" from the context menu, as shown in below image. If you cannot find the "Network" icon in the desktop, that icon may be hidden. Refer following link to learn how to add "Network" icon to desktop.
![]()
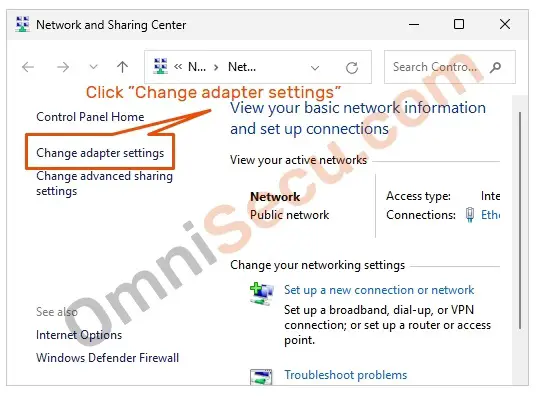
Step 2 – "Network and Sharing Center" settings window will be open as shown in the below screenshot. Click "Change adapter settings" link to open "Network Connections" settings window.
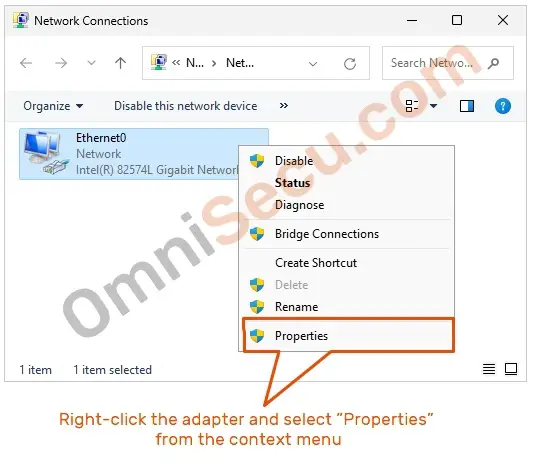
Step 3 – "Network Connections" settings window will be open as shown in below screenshot. Right–click the Ethernet adapter which you want to configure the new IPv6 address, and select "Properties" from the context menu.
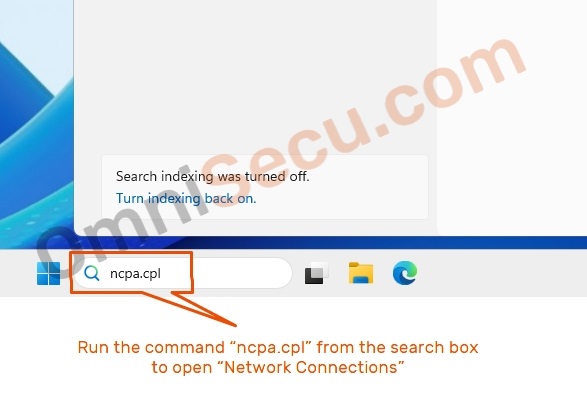
You may avoid Step 1 and Step 2 and directly open "Network Connections" settings window by typing "ncpa.cpl" at the search box, and then clicking "ncpa.cpl" from the search results.
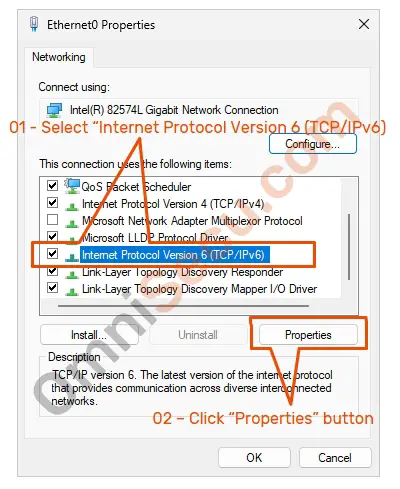
Step 4 – From Ethernet adapter Properties dialog box, select IPv6 settings from the list box, and then click "Properties" button as shown in below image
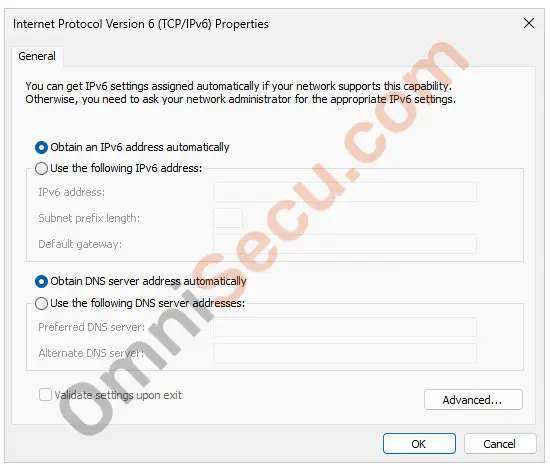
Step 5 – "Internet Protocol Version 6 (TCP/IPv6) Properties" dialog box will be opened, as shown in the below screenshot. You can see from the below image that the IPv6 settings are configured to obtain automatically from a DHCPv6 server. If there is no DHCPv6 server in your network, you must configure an IPv6 address manually, for this Windows Server to become a part of the IPv6 network.
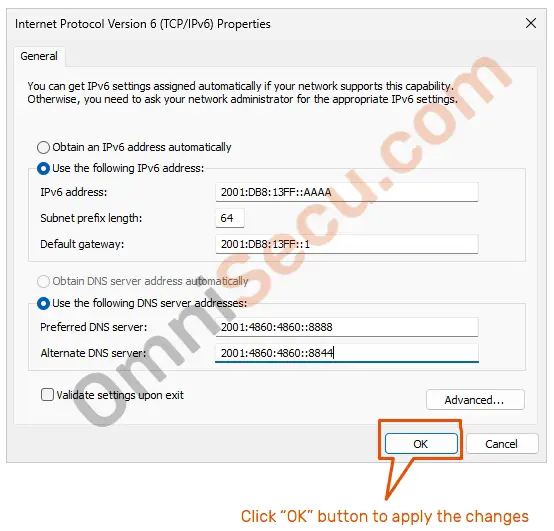
To configure an IPv6 address manually, enter the IPv6 address, Subnet prefix length, IPv6 Default gateway address and IPv6 DNS Server addresses as shown below. Click "OK" button to apply the changes and close the dialog box. Please click the "OK" buttons in the previous opened dialog boxes also, to apply the changes.
Click the following links, if you are not sure what is Subnet Mask, what is Default Gateway and what is prefix length in IPv6.
Written by Jajish Thomas.
Last updated on 9th June, 2024.